

Hercules SETUP utility is useful serial port terminal (RS-485 or RS-232 terminal), UDP/IP terminal and TCP/IP Client Server terminal. It was created for HW group internal use only, but today it's includes many functions in one utility and it's Freeware! With our original devices (Serial/Ethernet Converter, RS-232/Ethernet Buffer or I/O Controller) it can be used for the UDP Config.
- Complete support for Windows 7, 8, 8.1 and 10
- All basic TCP and UDP utilities in one file, no installation required (just one .EXE file)
- Implemented Serial Port Terminal is working with the Virtual Serial Ports (COM12 for example). You can check and control all serial port lines (CTS, RTS, DTR, DSR, RI, CD)
- Simple TCP client (like the Hyperterminal) with the TEA support, view format, file transfers, macros..
- Easy to use TCP Server with the TEA support, view format, file transfers, macros..
- Hercules contains simple UDP/IP "Terminal" with view formats, echo, file transfers, macros..
- Support the NVT (Network Virtual Terminal) in the Test mode tab, as like as NVT debuging features..
- Using Telnet extended with NVT allows serial port configuration (RFC2217), device identification, confirmation of data sequence, etc.
- It's FREEWARE you can use and share this software free
Hercules is great utility if you are working with the serial and Ethernet devices & interfaces. General useful parts :
- Serial port terminal (COM5 and higher support)
- TCP/IP Client terminal (similar to "Telnet")
- TCP/IP Server "terminal"
- UDP "terminal"
For HW group devices only :
- UDP Config utility (IP, Port, MASK, GW setting)
- Test mode (TCP/IP terminal with TEA authorization support and NVT (Network virtual Terminal) parser for remote I/O pins control.
The Hercules SETUP is compatible with our free Virtual Serial Port, you can debug applications connected to remote serial port using Windows 2000 or higher.
UDP Config
 |
This tab is to be used with HW-group devices only. In this window you can assign the IP address to compatible devices (PortBox, PortStore, PortStore2, I/O Controller, Charon 1 module, Poseidon etc..) Parameters :
|
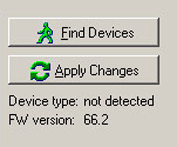 Find Devices button
Clicking on this button will find all the devices on your network segment.- Apply Changes button
The parameter changes are applied by clicking on this button. Otherwise the changes will not take place. - Device type
Not supported by most of the devices
 Modules MAC list
In this window will be displayed the MAC addresses (a.k.a physical addresses) of the devices connected to your network segment. Clicking on a particular MAC address will highlight it and will show the parameter values of the respective device in the Required parameters field.
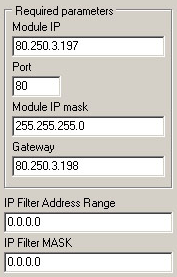 Module IP
This field displays the IP value of the respective device which has the MAC address highlighted in the Modules MAC list.- Port
This field displays the port the device (operating as server) listens to. For the Connect with TCP Client button to work it has to be set to 23 (Telnet). - Module IP mask
The Subnet Mask in this case 255.255.255.0. It must be the same for all the devices in the network segment. - Gateway
The IP address of the PC, router or switch interface, etc., with which the device is directly connected. - IP Filter Address Range
W: Address (0.0.0.0 allows all)
IP address of a network or computer that is allowed to communicate with the device. This value must result from multiplying the remote IP address and the restriction mask (option N), otherwise the device does not react.
More details to the IP Filter you can find in the device's manuals, include examples and counting formulas.. - IP Filter MASK
N: Mask (0.0.0.0 allows all)
This mask restricts addresses that can communicate with the device. Security can be greatly enhanced by setting a fixed address or a suitable restrictive mask that disallow communication with unauthorized parties.
(IP requesting access AND N ) = W
If this condition is valid, you can access the device (AND is binary multiplication). More details in the device's manuals.
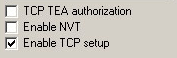 TCP TEA authorization: Checking this box enables encrypted communication with the device using TEA.
 - Enable NVT: Checking this box enables to send to the device NVT commands.
- Enable TCP setup: Checking this box enables the configuration of the device with the TCP Client.

 TCP Setup configuration button
Clicking on this button will automatically open a connection to the device through port 99. In the TCP Client menu you will see the device configuration mode. Press enter to see the parameters that you can set.- Connect with TCP Client button
Clicking this button will automatically open a Telnet connection with the device (port 23). If the Port field of the device (the port where the device listens to) is not set to 23 this connection will fail. - Open in the WEB Browser button
Clicking this button will open the page of the device in a WEB browser, if the device has a WEB server running.

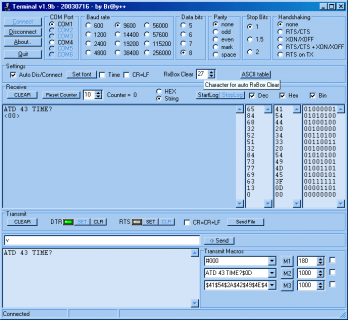
Serial
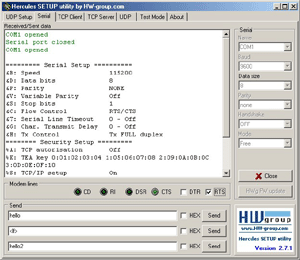 |
The Serial tab of the Hercules utility can be used as a simple serial port terminal for the RS-232 standard. It's similar to the Hyperterminal, some functions extended. Parameters :
|
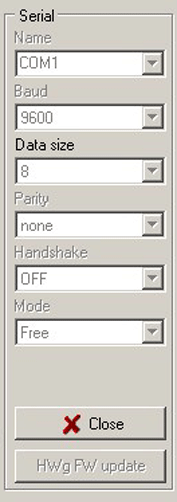
- Name define the number of the serial communication port.
- Baud specifies the transmission rate in bauds [Bd].
- Data size specifies the number of data bits in a character.
- Parity
Specifies how the system uses the parity bit to check for transmission errors. Options are none, even, odd and mark. - Handshake
Transmission control to pause data transfer, when receiving buffer of the opposite device if full.- Off: No handshake between the devices.
- RTS/CTS: Hardware hanshaking This method uses hardware lines RTS (Request to Send) and CTS (Clear to Send). When a receiver is ready for data, it asserts the RTS line indicating it is ready to receive data. This is read by the sender at the CTS input, indicating it is clear to send the data.
- XON/XOFF protocol: Software handshaking. The flow control used to protect against data overruns, uses data bytes as control characters. XON/XOFF protocol is controlled by the data recipient who sends an XOFF character (ASCII DC3, decimal 19, hex 13) to the sender if it is unable to continue to receive data. The sender suspends transmission until it receives an XON character (ASCII DC1, decimal 17, hex 11).
- Mode
Mode selection is dedicated for testing HW group devices For your operations use default "free" mode. - Open|Close button
Open and Close the serial connection with a device with the above mentioned parameters. - HWg update button
Opends a dialog box to send a HWg firmware file (.Hwg) to update the firmware of the remote device. It's detailed described in every product's manual..
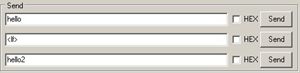
 Send macro button
To sent data to the device press send button on the right of the respective field or use F1, F2, F3 respectively for the first, second and third field. Check the HEX box to send hex characters (used to send NVT commands). The ASCII characters are sent by typing #xxx (where x is a number in 0...9), $yy (where y is a hex number) or for example for line feed or for carriage return. To send the character #, $ or < type ##, $$ and << respectively. Hercules can also control and monitor other RS-232 lines like RTS, CTS, DTR or DSR
You can find detailed information about RS-232 and these lines at http://www.hw-server.com/rs232

TCP client
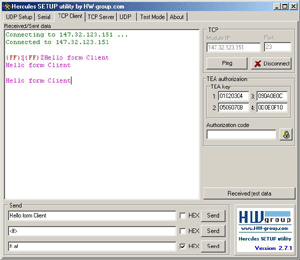 |
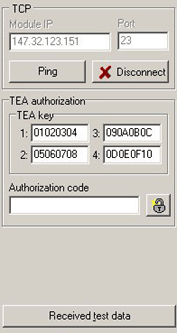
The TCP Client tab of the Hercules utility can be used as a simple TCP/IP Client terminal similar to Telnet. Parameters :
|
 Module IP
The IP address of the remote device.- Port
The port of the remote device - 23 for Telnet, 99 for TCP configuration of HWg devices. - Ping button
Facility to ping the remote device to check for a connection. Results displayed in the Received/Sent data window. - Connect|Disconnect button
Open and close the TCP/IP connection with the remote device. - TEA key
Secure 16 bytes pasword. It's set on both sides, it's never going thought network.
It's defined in most of our devices as 4 groups with 4 bytes defined in HEX form. - details - Authorization code
To open communication with the TEA secured device, you have to cut 12 digits to your clipboard and paste it into "Authorization code" form.Than click the button with the picture of the padlock and the result will be send to the connection.
If your TEA Key is equal to the Key on the opposite side, the TCP connection is enabled. Otherwise the connection is with some timeout closed by the TCP Client (device). - details - Received test data button
Receive the test data file. It's function dedicated for the PortStore and PortStore2 testing.. - details  Send button
To sent data to the device press send button on the right of the respective field or use F1, F2, F3 respectively for the first, second and third field.
Check the HEX box to send hex characters (used to send NVT commands). The ASCII characters are sent by typing #xxx (where x is a number in 0...9), $yy (where y is a hex number) or for example for line feed or for carriage return. To send the character #, $ or < type ##, $$ and << respectively.

TCP server
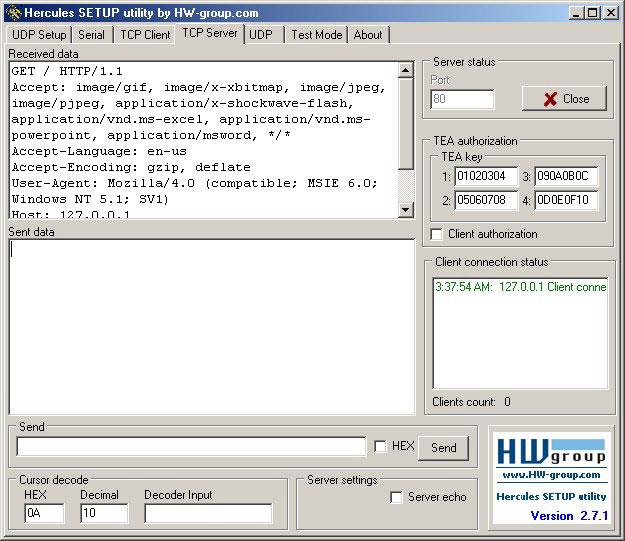 |
The TCP Server tab of the Hercules utility can be used as TCP Server terminal and listen to any port. The data received from the Client will be displayed in the Received data window Parameters :
|
 Port
Port
The port at which the server listens to - 80 for HTTP, 23 for Telnet, etc.
Hercules details: Check our simple example, how you can test the HTTP server..- Listen|Close button
Listen to a port and close the connection. - TEA authorization
Here in the server version i.e., server just accept or reject connection, if client use the same TEA key. You can test it if you run 2x Hercules SETUP as the TCP client in first window and TCP server in second window. - Client authorization
Open and close the TCP/IP connection with the remote device. - Client connection status
Displays the status of the connection and the number of the clients connected.
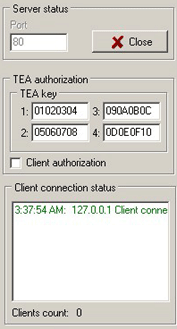
TCP server lisening on specified port in the Server status and show received data in RAW format. You can try Listen on port 80 on your PC and entry your IP address into your browser..
Note: Don't use receiveing port lower than 1024 in MS Windows, it can make you troubles with TCP/IP comunication, because Windows using these port numbers for system functions.
 Send button
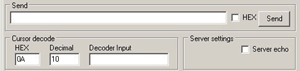
To sent data to the device press send button on the right of the respective field. Check the HEX box to send hex characters (used to send NVT commands). The ASCII characters are sent by typing #xxx (where x is a number in 0...9), $yy (where y is a hex number) or for example for line feed or for carriage return. To send the character #, $ or < type ##, $$ and << respectively.- Cursor decode
Show HEX and Decimal value of the character before cursor in the Received data window. If you want to know Value of some specified character, write it into Decoder Input window. - Server settings - Server echo
By checking this checkbox the TCP Server start ECHO function = it's send back every received data to the TCP connection.

UDP tab
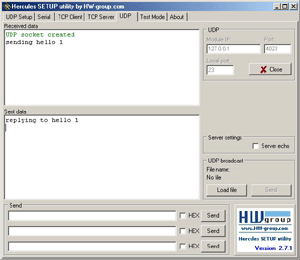 |
The UDP tab is simple "terminal" based on the UDP datagrams.
|
 Module IP
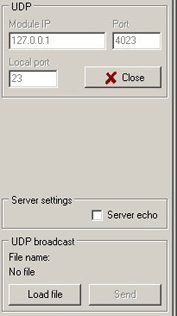
The IP address of the remote device.- Port
The port of the remote device where the UDP packets are sent. - Local port
Listen to this local port for received UDP packets.
Hercules details: Check our simple example, how you can communicate over UDP from one Hercules to next Hercules on the same PC. - Server settings - Server echo
By checking this checkbox the UDP "terminal" start ECHO function = it's send back every received data to the defined UDP destination. - UDP broadcast
By loading a special broadcast file .brf you can send broadcast packets to the network.
You can find details in specialized PDF file: Charon1_broadcast.pdf

 Send button
To sent data to the device press send button on the right of the respective field or use F1, F2, F3 respectively for the first, second and third field.
Check the HEX box to send hex characters (used to send NVT commands). The ASCII characters are sent by typing #xxx (where x is a number in 0...9), $yy (where y is a hex number) or for example for line feed or for carriage return. To send the character #, $ or < type ##, $$ and << respectively.
Test mode tab
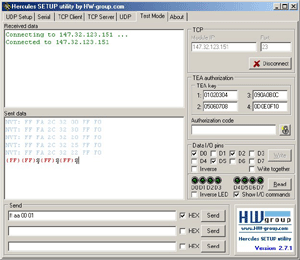 |
The Test mode is developed for testing all functions of HW group Ethernet devices. In fact, it's just TCP client extended with some more functions. Parameters :
|
 Module IP
The IP address of the remote device.- Port
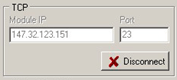
The port of the remote device - 23 for Telnet, 99 for TCP configuration of HWg devices. - Connect|Disconnect button
Open and close the TCP/IP connection with the remote device.

The TEA authorization
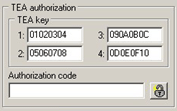 TEA key
Secure 16 bytes pasword. It's set on both sides, it's never going thought network.
It's defined in most of our devices as 4 groups with 4 bytes defined in HEX form. - details- Authorization code
To open communication with the TEA secured device, you have to cut 12 digits to your clipboard and paste it into "Authorization code" form.Than click the button with the picture of the padlock and the result will be send to the connection.
If your TEA Key is equal to the Key on the opposite side, the TCP connection is enabled. Otherwise the connection is with some timeout closed by the TCP Client (device). - details

The NVT (Network Virtual Terminal) functions
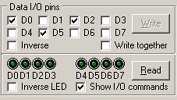 The Data I/O pins box uses NVT commands to control the I/O pins of the Charon module or the I/O Controller device. By checking on of the D0...D7 checkboxes you are setting to OFF one of the respective LEDs and by unchecking you set them to ON.
It is working only if you have switched on the NVT! or the [V: NetworkVirtualTerminal On] selection in the SETUP of the device. more- Inverse
The polarity of the output will change. That is check will mean ON and uncheck will mean OFF. - Write together and Write
Check Write together and you will send NVT commands only when you press Write button and not immediately after you check any D0 .. D1 checkbox.
Hercules details: Check our short description, how to handle with Binary I/O pins - Read button
Clicking it will read the value of the inputs and update each virtual LED of Hercules. These inputs are on the screen displayed by 8x LEDs on the left of the READ button. LED switched on = logical 0 on the input. (The display is inverted logic) - Inverse LED checkbox
By checking it you change the polarity of the LEDs shown in the Hercules window, the virtual LEDs (that means if the virtual LEDs are OFF in the window the real LEDs are actually ON if the Inverse LED checkbox is checked). - Show I/O Commands checkbox
Enables the display of outgoing NVT commands from the " Data I/O pins " section. You can see the commands that switch on/off specific outputs every time you click on the respective D0 ... D7 output.

- Send button
To sent data to the device press send button on the right of the respective field or use F1, F2, F3 respectively for the first, second and third field.
Check the HEX box to send hex characters (used to send NVT commands). The ASCII characters are sent by typing #xxx (where x is a number in 0...9), $yy (where y is a hex number) or for example for line feed or for carriage return. To send the character #, $ or < type ##, $$ and << respectively.
Hercules - Right click menu
|
Don't miss, there is configuration menu, you can open by click to the right button of your mouse in the main window. Note: Different tabs have different features of this menu. Parameters
|
 Hex enable
If checked then the characters will be displayed in hex form - {hex number}.- CR/LFenable
If checked then the interpretation of CR and LF will depend on Transmit EOL menu.
Example:
checked (Windows/DOS mode in Transmit EOL)
a<CR><LF>b = a<new line>b
a<CR>b = ab
a<LF>b = ab
that is it ignores <CR> and <LF> but not <CR><LF>unchecked (Windows/DOS/Linux/MAC)
a<CR><LF>b = a<new line>b
a<CR>b = a<new line>b
a<LF>b = a<new line>b
that is interprets all combinations as newline character - Local echo
If checked except the sent characters the local echo characters will also be displayed in pink color. - Delete EOL
Controls the <BS> (backspace) character.
if checked and the cursor is in the beginning of the line and <BS> is pressed then the end of the previous line is deleted and the cursor moves to the end of the other line.
If unchecked and the cursor in the beginning of the line and <BS> is pressed then the end of the previous line is not deleted and the cursor remains in the beginning of the line. - NVT enable
Allows to see the NVT commands received or sent. The NVT commands will be displayed in blue. If unchecked then these commands will not be displayed clearly in the Received/Sent data window. - Special chars
Displays special characters (for example CR - carriage return and LF - line feed) except the text. In ascii mode you can see that it writes the ascii names of the special characters. In hex and dec it displays the hexadecimal and decimal code of the special characters respectively. In text mode you do not see these characters. - Transmit EOL
Tells to the program what will be interpreted as end of line for different types of OS. For Windows the CRLF sequence will be EOL, for Unix LF and for Mac the CR character. It is important to choose the right one! - Word-wrap enable
If unchecked then the text in the Received/Sent data window will be written in one line because the CR and LF chars will not be taken into account.
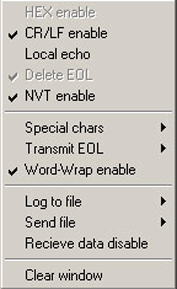
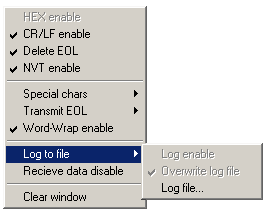
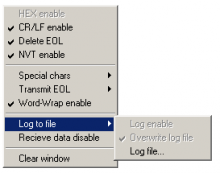 Log to file
You can log what is displayed on the window in a text file. After specifying the file you have to check Log enable in the same menu. If checked Overwrite log file does not append the new data to the log file but overwrites them deleting the old data.- Receive data disable
If checked the received data will not be displayed. - Clear Window
Clears the window. Deletes the text displayed.
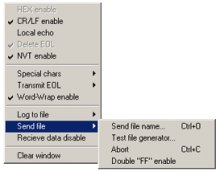 Send file (used only in the Serial tab)
Sending defined binary file to the connection..
- Test file generator
Test file generator is function dedicated for the PortStore and PortStore2 testing.. It's used mainly for working with our devices together with Received Test Data in the TCP Client menu. - detailed example & description

Other Terminals
 Terminal (bray.velenje.cx/avr/terminal/)
Terminal is a simple serial port (COM) terminal emulation program. It can be used for communication with different devices such as modems, routers, embedded uC systems, GSM phones.
- Very small size (246 Kb only), only one Terminal.exe file only, no instalation required,
- Macros functions supporting HEX and special ASCII characters (10,13..),
- Support only COM1 - COM6 (You can't use COM7 or higher..), but full compatible with Virtual Serial Ports on COM1..COM6,
- Log file, send file support,
- You can control DTR & RTS outputs, but no inputs indication- Portmon for Windows NT/9x (www.sysinternals.com)
Portmon is a GUI/device driver combination that monitors and displays all serial and parallel port activity on a system. It has advanced filtering and search capabilities that make it a powerful tool for exploring the way NT works, seeing how applications use ports, or tracking down problems in system or application configurations.
- RS232-Access (mitglied.lycos.de/weingaunity/index.html)
Easy RS-232 terminal, scan ports, binary indication and another possibilities. - Screenshot
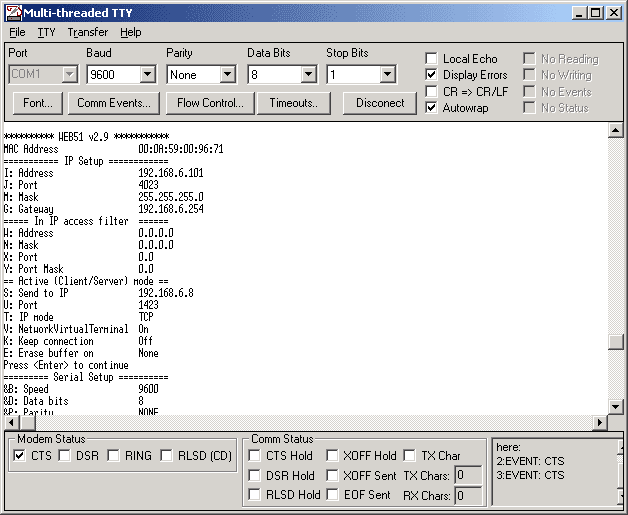
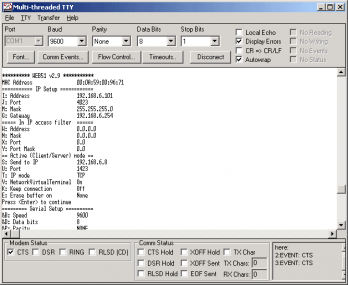 MTTTY - Multi-Threaded TTY Sample (www.netburner.com/support/downloads.htm)
 - Microsoft very useful and quite friendly serial terminal modified by Netburner. It works with all Virtual Serial ports, display modem pins status, you can send and receive files...

Distribution and usage conditions
- This software is FreeWare, but only if you respect the following conditions.
- This software cannot be modified in any way without the HW group's permission.
- Private license :
Usage and distribution of this software for private use is not limited, but we will be glad, if you place our link (www.HW-group.com) or icon on your website or blog (see table below). - Commercial licence :
Organisations or any other institutions can use and distribute the software ONLY if they publish a link to our website (www.HW-group.com) as described in the table on this SW product’s page..
Publishing the WWW link:- On the WWW pages of the company, which uses or distributes the SW.
- If the software is used or distributed along with other company's product, the link can be placed on the product's WWW page.
- Other link placement can be agreed with the HW group company via e-mail.
If you distribute the software and you will not publish the link as described, you are in violation of our author's rights and we will take action according to the law.
Possible linksSource code for your WWW pagesHercules SETUP utility
useful serial port terminal (RS-485 or RS-232 terminal) , UDP/IP terminal and TCP/IP Client Server terminal. Produced by www.HW-group.com.<b><a href="http://www.hw-group.com/products/Hercules/index_en.html">Hercules SETUP utility </a></b><br>
useful serial port terminal (RS-485 or RS-232terminal) , UDP/IP terminal and TCP/IP Client Server terminal. Produced by <a href="http://www.HW-group.com" target="_blank">www.HW-group.com</a>. Hercules SETUP utility
useful serial port terminal (RS-485 or RS-232terminal) , UDP/IP terminal and TCP/IP Client Server terminal. Produced by www.HW-group.com.<a href="http://www.HW-group.com"><img src="http://www.HW-group.com/files/swapplication/5462-hercules-setup-utility/..." width="88" height="31" hspace="3" vspace="0" border="0" align="right"></a> <b><a href="http://www.hw-group.com/products/hercules/index_en.html">Hercules SETUP utility </a></b><br>
useful serial port terminal (RS-485 or RS-232terminal) , UDP/IP terminal and TCP/IP Client Server terminal. Produced by <a href="http://www.HW-group.com" target="_blank">www.HW-group.com</a>.<a href="http://www.HW-group.com"><img src="http://www.HW-group.com/files/swapplication/5462-hercules-setup-utility/..." width="88" height="31" hspace="3" vspace="0" border="0"></a> Hercules SETUP utility - Produced by www.HW-group.com. <b><a href="http://www.hw-group.com/products/hercules/index_en.html">Hercules SETUP utility </a></b> - Produced by <a href="http://www.HW-group.com" target="_blank">www.HW-group.com</a>. Note: The icon image, which is loaded from the HW group website, can be saved on your local hosting, but we prefer the code in this table. - Exclusion of warranties: The software is provided strictly "as is". without warranties of any kind, either express or implied, including warranties of title, noninfringement, merchantability or fitness for any particular purpose. limitation of liability: in no event shall HW group nor its vendors be liable for any damages whatsoever (including without limitation loss of profits, loss of use, loss of data, interruptions of business, or lost information) arising out of the use of or inability to use the software, even if HW group has been advised of the possibility of such damages. some jurisdictions prohibit exclusion or limitation of liability for implied warranties or consequential or incidental damages, so the above limitation may not apply to you. you may also have other legal rights that vary from jurisdiction to jurisdiction.