Product run-out
IP Relay Control is a software designed for working with the IP relay device. You can control the relay contacts with a single click. The IPRC is a single executable, there is no need to install. If you need to control the IP Relay from your application, you can use the (Borland C++ 6.0) source codes, which are available to download.
- Simple graphic environment for Windows 95/98/ME/2000/XP
- Searching IP Relays in the local network by a UDP Broadcast
- Allows assigning name to the IP relay depending on an IP address.
- The Reset function allows short-term (30 sec) status change
- Contacts type autodetect
- Shows duration of the running connection
- The Read button for loading the actual IP relay state
- Writing the executed operation into a log
- The software is a single executable file, there is no need to install.
IP Relay is a cheap device designated to be used mainly in industry and telecommunications. You can order a DIN molding version. The relay's contacts can be also modified for your needs, in the standard version one contact is used for interrupting power source (on incomming Ethernet command), the other is used as a reset switch, both relays are controlled over Ethernet. You can setup the contact's power-up state.
Usage examples
- Watching IP camera system's failure
- Remote control of the network configuration
- Remote control and restarting of micowawe connections.
 IP Relay is an Ethernet enabled device, that can control these peripherals over the network:
- 1x RS-232 serial port (Terminal server)
- 2x Relays (contact configuration depends on the ordered IP Relay version)
For RS-232 and terminal server (RS-232 / Ethernet converter) control, there is the HW Virtual Serial Port which adds a virtual COM port to your windows system. All the data from this port is then redirected to another HW interface.
The IP Relay outputs can be also controlled from the HW VSP application, but for many applications you don't need such a special software and a simple Windows utility will be much better. Then you can use the IPRC, which can control only the two relays.
IPRC source codes are available for free download, so you can use it to implement IP relay controlling into your application. (Download).
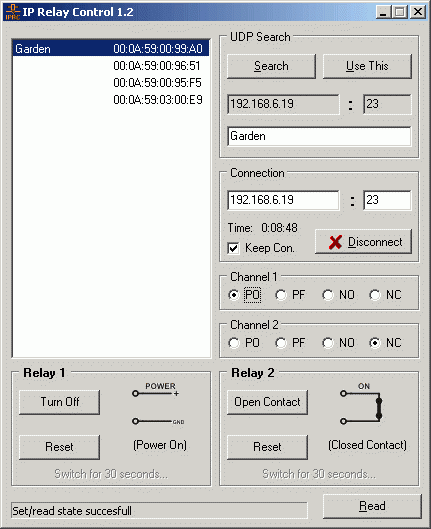
IPRC configuration
UDP Search
In the upper left section of the application the list of found devices and their MAC addresses is displayed. You can search for the individual devices within the local network with the Search button in the UDP Search section. By choosing appropriate MAC address the actual assigned IP address and port will be written into the fields below the Search button. This is useful especially for large networks, where you don't have to remember each device's IP or MAC address.
By the Use This button is either the corresponding signature written into the configuration file of the IP Relay Control and the IP address and port transferred into the relevant fields of the Connection section.
Connection
The Connection section serves for opening and closing a TCP connection with the corresponding IP relay module. With the Connect, (or Disconnect) button you can create or dissolve this connection.
The check box named Keep Connection is used for holding the TCP connection opened. If you don't check this option, the program will automatically disconnect from the device after approx a minute.
Outputs configuration
 The are four possible output configurations. The IP Relay has a channel type autodetection, if succesfull, it will set the correct output configuration and will not allow the user to change it.
if it’s fault, you can define Channel’s type manually by the Channel 1 and Channel 2 switches, which allow assigning four possible configurations to the particular channels:
- PO - Power On,
- PF - Power Off,
- NO - Normally Open,
- NC - Normally Close.
Relay control
Opening/closing the contacts
The relays can be controlled in the Relay 1 and Relay 2 sections by buttons:
- Turn On – turn the power supply on;
- Turn Off – turn the power supply off;
- Close Contact – close the contact ;
- Open Contact – open the contact .
For better recongnition the actual relay states are also shown graphically as schematic marks, which can, as well, serve to verify the configuration.
Note: Immediate changing of the schematic pictures representing the relay's state works only if the IP relay is connected. In other case their exchange will not proceed until the TCP connection is established.
.

Reset button
While the buttons allow switching the device into desired state ad infinitum, in many cases the relay will be used mainly as a remote reseter for the necessary short-term status change of the controlled device. This is achieved by the Reset button, which ensures short-term (30 second long) status change. This assure that the controlled relay will be brought back to the default state regardless the previous contact state, set by the user.
Note : The default state means the default IP relay HW configuration.
The Read button
The Read button is intended for checking the actual IP relay state. On the left of there is a control line, which writes out the actual state of the required operation.
Operation logging
IP Relay Control also contains the logging function of the performing operations which writes, in text format, into the log file the individual operations, performed by the IP relay devices together with time information. This serves to verify, in return, if the status change was or was not evoked by the IP relay:
(II) 19:23:35 192.168.5.21: Connecting... (II) 19:23:38 192.168.5.21: Connected
(II) 19:23:38 192.168.5.21: Read state of relay 1 (sent FF FA 2C 32 30 FF FO)
(II) 19:23:38 192.168.5.21: Read state of relay 2 (sent FF FA 2C 32 30 FF FO)
(II) 19:23:38 192.168.5.21: State output pins acknowledge (received FF FA 2C 97 31 FF F0)
(II) 19:23:38 192.168.5.21: State output pins acknowledge (received FF FA 2C 97 31 FF F0)
(II) 19:23:41 192.168.5.21: Read state of relay 2 (sent FF FA 2C 32 30 FF FO)
(II) 19:23:41 192.168.5.21: State output pins acknowledge (received FF FA 2C 97 31 FF F0)
(II) 19:23:45 192.168.5.21: Disconnected
(II) 19:23:46 192.168.5.21: Connecting...
(II) 19:23:46 192.168.5.21: Connected
(II) 19:23:46 192.168.5.21: Read state of relay 1 (sent FF FA 2C 32 30 FF FO)
(II) 19:23:46 192.168.5.21: Read state of relay 2 (sent FF FA 2C 32 30 FF FO)
(II) 19:23:46 192.168.5.21: State output pins acknowledge (received FF FA 2C 97 31 FF F0)
(II) 19:23:46 192.168.5.21: State output pins acknowledge (received FF FA 2C 97 31 FF F0)
(II) 19:23:53 192.168.5.21: Channel 1 set POWER from ON to OFF (output pin Hi, sent FF FA 2C 32 25 FF F0)
(II) 19:23:53 192.168.5.21: Channel 1 set LED to OFF (output pin Hi, sent FF FA 2C 32 20 FF F0)
(II) 19:23:53 192.168.5.21: State output pins acknowledge (received FF FA 2C 97 11 FF F0)
(II) 19:23:53 192.168.5.21: State output pins acknowledge (received FF FA 2C 97 10 FF F0)
(II) 19:23:54 192.168.5.21: Channel2 set CONTACT from OPEN to CLOSE (output pin Lo, sent FF FA 2C 32 16 FF F0)
(II) 19:23:54 192.168.5.21: Channel2 set LED to ON (output pin Lo, sent FF FA 2C 32 17 FF F0)
(II) 19:23:54 192.168.5.21: State output pins acknowledge (received FF FA 2C 97 50 FF F0)
(II) 19:23:54 192.168.5.21: State output pins acknowledge (received FF FA 2C 97 D0 FF F0)
(II) 19:24:26 192.168.5.21: Keep connection (command NOP)
(II) 19:25:06 192.168.5.21: Keep connection (command NOP)
(II) 19:56:26 192.168.5.21: Keep connection (command NOP)
(II) 19:57:06 192.168.5.21: Keep connection (command NOP)
(II) 19:57:13 192.168.5.21: Disconnected